Articles by "howhappen"
Showing posts with label howhappen. Show all posts
H ello welcome to Techmafia, we will be discussing about how to remove or delete the windows.old folder on windows 10. This folder consume more than 20 gb space. windows.old folder automatically created whenever user gets updated their computer with new operating system. if you not satisfy with new windows then you might easily downgrade to older version of operating system. Windows.old folder cannot directly easily delete by clicked on delete button.if you want to delete the file consumption folder then you might be follow below steps.

Step 1: Open This PC from Desktop.

Step 2: Right click on C drive,and open properties. 


Step 3: Click on Disk CleanUp.


Step 4: Click the Clean up system Files button.


Step 5: Select the previous windows installation option to delete windows.old files. You can also delete temporary installation files and other Useless temporary data.

Step 6: Hit the OK button after selection is completed.

Step 7: On the confirmation pop-up dialog click delete files button.

Step 8: Click Yes to complete the partially completed process.

Hello welcome to Tecmafia, We will be discussing about how to Disable automatic updates in windows 10. Microsoft has made it compulsory for windows 10 users to receive and update their computer. for windows 10 Pro users have an option to delay automatic updates. that's mean for pro users it is not compulsory to update their computer at a time. This feature is good for the users but not every user wants their windows 10 updated on microsoft schedule. Here are a couple of tricks that disable your automatic updates.

Method 1: Metered connection

Step 1: Metered connection is the Easiest way to disable automatic Updates. For disable updates navigate to Settings→ Network & Internet→Wi-Fi→Advanced Options.

Step 2: Turn On Metered connection.

Must Read:- how to download all your pictures and videos from google photos


Step 3: After enabling metered connection, windows update will say updates are available. And you can click the download button to download and install updates at your free time.

Method 2: Local Group Policy Editor

Step 1: Open the run menu(windows+r). in it type gpedit.msc and press enter.


Step 2: You will see group policy editor menu. In left panel of group policy editor Navigate to Computer Configuration\Administrative Templates\Windows Components\Windows Update.

Step 3: After navigate to windows Update find and double click on configure automatic updates.


Step 4: In configure dialog box select Enabled.

Must Read:-

Step 5: In the Options box, pull down the Configure automatic updating menu and select your preferred option.

Step 6: now your automatic updates disabled.
Alert message : Group policy method only for Windows 10 Education,  Pro and Enterprise Users. Not for windows 10 Home Users.
Hello welcome to Tecmafia, We will be discussing about how to download all pictures and photos from google photos. Google Photos app automatically backup your photo and video in the cloud. it also organise them onto albums and create short movies from the uploaded photos. But in the mobile app Google photos doesn't offers functionality to download all the photos in one single click. All the Photos need to select by the user. it very time wasting process. So below is the two method to download backup photos very easily. You need to follow only one method.
 Method 1:

Step 1: Go to below link and select the photos by clicking on the top left corner of the Image. You can choose many or one Image.
     
                                                    Click On


Must Read:- How to Export contacts from your Android Device to your Gmail Account.
Step 2:  Click on the three vertical dots at the top right corner.


Step 3: All photos are downloaded using zip file

Method 2:

Step 1: follow the  below link. 
                                        
                                                   Click On
                                                        
Step 2: Click On "Select None". Then Scrolled down to the bottom and find Google Photos. Click into the box and select google photos. After complete the process by clicked on the done at bottom of the page.

Step 3:  Choose your file type and delivery method.


Step 4: just click on Create Archive. Whenever the archive is completed, click on download. And you might download all the google photos very easily.

Must Read:- 


Step 5: After downloading is completed click on done.

H
ello welcome to Tecmafia, We will be discussing about how to download Google's new operating System android O. The Developer Preview available on 21 march. But not recommended for all General public. The New update is reveal for not all the devices, its for specific smartphone. If you have any of these smartphone then you can easily installed new OS Android O. 
  
Must Read:- How to Export contacts from your Android Device to your Gmail Account.

Android O Supported Devices: 
  1. Google Pixel
  2. Google Pixel XL
  3. Google Pixel C
  4. Google Nexus 6P
  5. Google Nexus 5X 
  6. Nexus Player  
Step 1: You have First register your smartphone for Android Beta Program. Just Click On below link.

                                                                                                        Register
Step 2: After you complete Registration process and accept terms and condition. Your device will be ready to receive New update directly over the air. either New update is automatically pop up, or you can manually check for New updates.

Step 3: Open the Setting menu and navigate to About phone → System Updates.

Step 4: Once the Download is completed your devices is ready to restart for install the New android O update. 

Alert message : Updates can take upto 24 hours to arrive after you completed Registration.

                           
H ello welcome to Techmafia, we will be discussing about how to Export contacts from your phone to your Gmail account. After getting a new phone you lose everything you had on the old phone. This type of situation is only handle if you created a backup of your contacts. Google contacts is the Most trusted backup to save your contacts in your gmail account. Follow the below steps and you might be save your contacts in your gmail account.

Step 1: To auto backup your contacts from android,  firstly open the setting menu.


Step 2: Scroll down to the bottom and open the Accounts tab.


Step 3: After click on accounts tab open your google account tab.


Step 4: Turn on automatically sync to Gmail Account from your android smartphone. and it would create backup of your contacts to your Gmail account.


➥  Must Read:- 


Step 5: Go to Your gmail account on your computer. You can see all your android contacts to your gmail account.


Gmail

Hello welcome to Tecmafia, We will be discussing about how to remotely log out your gmail account on multiple devices. In daily life,  there are many situation in which we forget to logout gmail account. whether its a lost phone, laptop or tablet or if we borrow a laptop and forget to sign out.  So here is the answer all above the questions. Just Follow below easy steps and you might be sign out from all of the devices very easily.

Step 1: Log into your gmail account from any devices.

Login Page


Step 2: Scroll down to the bottom of your inbox and click on details button at the end of the page or follow the steps are taken in screenshots.
Gmail Account

Step 3: after click on details a new window will pop up with all recent sessions and a button to end them all.

Step 4: In the first column of a new pop up windows you will see the browser, device  or mail server. if you don't recognize your activity on the page, someone might be using your account. In this situation you might close all web sessions and immediately change your gmail account password.

Step 5: Otherwise Just click on sign out all other web sessions, and the task is completed. 

 Must Read:-


Activity Information
Google Webmaster tools


H
ello welcome to Tecmafia, We will be discussing about how to verify Blogger Blog on webmaster tools. Google is a best way to increase traffic on website. If you want google give you traffic then Just Submit your Blog to Webmaster tools. Google Webmaster Tools is also part of SEO. Just follow below Steps and verify your blog.

Step 1: First of all just sign into your google account and go to Google Webmaster tools.


Step 3: Open your Webmaster tools Dashboard.

Step 4: Different type of 5 Method are available to verify your Blog.
  • Google Tag Manager
  • HTML file upload
  • Google Analytics
  • HTML tag
  • Domain name provider
Step 5: Mostly Blogger uses Html Tag option. In this method just copy the Code. Open your blogger account and goto your template Setting →Edit Html. And paste the Meta tag code in your html After <Head>. And click on save option. 
➥ Must Read:-


Step 6: Open Your Webmaster tools account and Click on Verify Option. Now your Site is verified by Webmaster tools. Now you can see all the parameter related to SEO and very important for your blog.
H
ello welcome to Tecmafia, we will be discussing about how to combine Facebook Profile Picture and Facebook Cover Photo. Follow the below steps and you can easily create the combination of both photos very easily. We just use some type of Website that provides this type of services. You can Just upload your cover photo, and the website exactly cut down photo which will be used for profile. The Process is very simple and very effective. Just follow Below Steps
FB Cover photo and Profile Picture


Step 1: Just Click On below link to directly redirect on website 


Step 2: Click On "Merge Profile Picture and Cover Photo" Option.


Step 3: Now you have two options. You can directly choose your facebook cover photo or either you can upload a new photo.

Upload Photo


Step 4: Once the uploading is complete, Just Set your Cover photo view and click on OK when you are satisfied.

Set your cover photo view

Step 5: Now download your Profile and Cover Photo.

Download cover and profile photo


Step 6: Then Just upload the Both images to your facebook account. All work is completed, ENJOY

DNS ERROR

Hello, Welcome to Tecmafia we'll be discussing about how to fix DNS Server error problem.  the “DNS server not responding” is a message indicated when you hit on the troubleshooting using the control panel tools and also fixing the issue may sometime works but if not you have to go into more complex system repair. And they are too very easy just follow the below given three methods of which one method could fix the problems.

Method: Fix DNS Server error Using Control Panel.

Step 1:

Open the control panel through start Button.

Step 2:

Click on the network and Internet and open network and sharing option.


Step 3: 

open the change adapter settings open. Place in the left panel of Network and sharing option.

Step 4: 

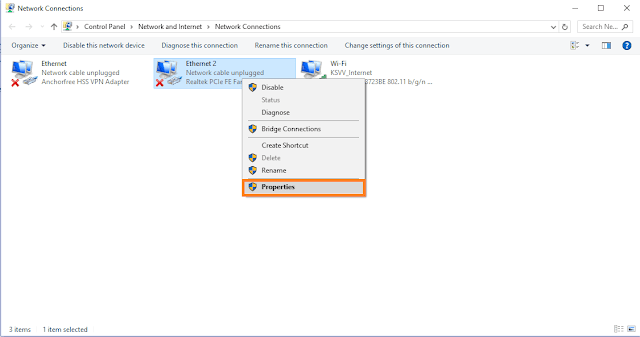
right click on properties of Ethernet. And Select the properties option.

Step 4


Step 5:

Click on Internet Protocol Version 4(TCP/IPv4)
Step 5

Step 6:

Finally set the preferred Dns Server 8.8.8.8 Then Save the changes. 

Step 6

App lock is one of the security application used by android users. App lock helps us to lock photos, Videos, audio, Docx or pdf file, contacts, apk, Protects the privacy of Users. But Applock will not give 100% security. Here is the Steps to hack Applock application.
                 
How to Hack Applock

Step 1:

Take the phone in which you want to hack Applock.

Step 2:

Now go to Setting and open Apps.


Step 3:

Just open the applock application from download section.
                                     
Apps Menu


Step 4:

Just click on Force stop in Applock Application section.

                                   
Applock


➥ Must Read:- How to install Bixby assistant on any Samsung Nougat Devices

Step 5:

Now Applock is not in Active state, So user open the lock application very ease.